Draw Circle on Map Swift
Update annotation: Rony Rozen updated this tutorial for Xcode 11 and Swift 5. Chris Wagner and Owen Brown wrote the previous versions of this tutorial.
While MapKit makes it like shooting fish in a barrel to add together a map to your app, that alone isn't very engaging. Fortunately, you can use custom overlay views to brand more appealing maps.
In this MapKit tutorial, you'll create an app that showcases 6 Flags Magic Mountain. By the time you're done, you'll have an interactive park map that shows attraction locations, ride routes and character locations. This app is for all you fast-ride thrill seekers out there. ;]
Getting Started
Download the starter project by clicking the Download Materials button at the tiptop or lesser of the tutorial. And then, open up the project in Xcode.
The starter project includes the map you'll work with and buttons to toggle the unlike types of overlays on and off.
Build and run. You'll see something like this:

Annotation: If y'all feel similar you demand a refresher on how to add a map to your app, or want to dive deeper on the basics of working with MapKit, visit MapKit Tutorial: Getting Started.
In one case you lot feel fix, dive right into overlay views.
All Nearly Overlay Views
Before you start creating overlay views, you need to sympathize two key classes: MKOverlay and MKOverlayRenderer.
MKOverlay tells MapKit where yous want it to draw the overlays. There are three steps for using this class:
- Kickoff, create your custom class that implements the
MKOverlayprotocol, which has 2 required properties:coordinateandboundingMapRect. These properties define where the overlay resides on the map and its size. - And so, create an instance of your class for each area where you want to display an overlay. In this app, for example, y'all'll create an case for a roller coaster overlay and another for a eating place overlay.
- Finally, add the overlays to your map view.
At this betoken, the map knows where it's supposed to display the overlays. But it doesn't know what to display in each region.
This is where MKOverlayRenderer comes in. Subclassing it lets yous set up what y'all want to display in each spot.
For instance, in this app, you'll draw an image of the roller coaster or restaurant. MapKit expects to present a MKMapView object, and this class defines the drawing infrastructure used past the map view.
Look at the starter project. In ContentView.swift, you'll see a delegate method that lets you lot render an overlay view:
func mapView( _ mapView: MKMapView, rendererFor overlay: MKOverlay ) -> MKOverlayRenderer MapKit calls this method when information technology realizes there'south an MKOverlay object in the region the map view is displaying.
To sum up, you don't add together MKOverlayRenderer objects directly to the map view. Instead, yous tell the map about MKOverlay objects to display and render MKOverlayRenderers when the delegate method requests them.
Now that you've covered the theory, it's time to put these concepts to employ!
Adding Your Information to the Map
Currently, the map doesn't provide enough information near the park. Your task is to create an object that represents an overlay for the entire park.
First, select the Overlays group and create a new Swift file named ParkMapOverlay.swift. Then supersede its contents with:
import MapKit course ParkMapOverlay: NSObject, MKOverlay { let coordinate: CLLocationCoordinate2D let boundingMapRect: MKMapRect init(park: Park) { boundingMapRect = park.overlayBoundingMapRect coordinate = park.midCoordinate } } Conforming to MKOverlay forces you to inherit from NSObject. The initializer takes the backdrop from the passed Park object, which is already in the starter projection, and sets them to the corresponding MKOverlay properties.
Next, y'all need to create a MKOverlayRenderer that knows how to draw this overlay.
Create a new Swift file in the Overlays group called ParkMapOverlayView.swift. Replace its contents with:
import MapKit course ParkMapOverlayView: MKOverlayRenderer { let overlayImage: UIImage // 1 init(overlay: MKOverlay, overlayImage: UIImage) { self.overlayImage = overlayImage super.init(overlay: overlay) } // ii override func draw( _ mapRect: MKMapRect, zoomScale: MKZoomScale, in context: CGContext ) { baby-sit permit imageReference = overlayImage.cgImage else { return } allow rect = self.rect(for: overlay.boundingMapRect) context.scaleBy(x: 1.0, y: -1.0) context.translateBy(ten: 0.0, y: -rect.size.summit) context.describe(imageReference, in: rect) } } Here's a breakdown of what you added:
-
init(overlay:overlayImage:)overrides the base methodinit(overlay:)past providing a second argument. -
describe(_:zoomScale:in:)is the real meat of this form. Information technology defines how MapKit should render this view when given a specificMKMapRect,MKZoomScaleand theCGContextof the graphic context, with the intent to draw the overlay epitome onto the context at the advisable scale.
Note: The details of Cadre Graphics drawing are outside the telescopic of this tutorial. Yet, you lot tin can see the lawmaking above uses the passed MKMapRect to get a CGRect in which to depict the image in the provided context. To learn more about Cadre Graphics, check out the Core Graphics tutorial series.
Great! Now that you have both an MKOverlay and MKOverlayRenderer, add them to your map view.
Creating Your Offset Map Overlay
In ContentView.swift, find addOverlay() and change its TODO content to:
permit overlay = ParkMapOverlay(park: park) mapView.addOverlay(overlay) This method adds an ParkMapOverlay to the map view.
Take a expect at updateMapOverlayViews(). Yous'll come across when a user taps the push button in the navigation bar to testify the map overlay, addOverlay() is called. Now that you lot've added the necessary code, the overlay displays.
Observe that updateMapOverlayViews() also removes any annotations and overlays that may be nowadays so you don't end up with duplicate renderings. This is not necessarily efficient, but information technology'due south a simple approach to clear previous items from the map.
The last stride continuing between y'all and seeing your newly implemented overlay on the map is mapView(_:rendererFor:), mentioned earlier. Supersede its current TODO implementation with:
if overlay is ParkMapOverlay { return ParkMapOverlayView( overlay: overlay, overlayImage: UIImage(imageLiteralResourceName: "overlay_park")) } When MapKit determines an MKOverlay is in view, it calls this delegate method to obtain a renderer.
Here, you bank check if the overlay is of class type ParkMapOverlay. If so, you load the overlay image, create a ParkMapOverlayView instance with the overlay image and render this example to the caller.
At that place'due south 1 little piece missing, though: Where does that suspicious lilliputian overlay_park image come from? It's a PNG to overlay the map with the defined park'due south boundary. The overlay_park image, constitute in Assets.xcassets, looks like this:

Build and run, enable the :Overlay: option at the top of the screen and voilà! Here's the park overlay drawn on top of your map:

Zoom in, zoom out, and motion around. The overlay scales and moves equally you would expect. Absurd!
Adding Annotations
If yous've ever searched for a location in the native Maps app, you've seen those colored pins appear on the map. These are annotations created with MKAnnotationView. You lot can apply annotations in your own app and use whatever prototype yous want, not just pins!
Annotations are useful to assistance highlight specific points of interest to park visitors. They work similarly to MKOverlay and MKOverlayRenderer, but instead you'll work with MKAnnotation and MKAnnotationView.
Writing Your Beginning Annotation
Outset, create a new Swift file in the Annotations group chosen AttractionAnnotation.swift. Then, supplant its contents with:
import MapKit // 1 enum AttractionType: Int { case misc = 0 instance ride case nutrient example firstAid func image() -> UIImage { switch self { case .misc: render UIImage(imageLiteralResourceName: "star") case .ride: return UIImage(imageLiteralResourceName: "ride") example .nutrient: return UIImage(imageLiteralResourceName: "food") example .firstAid: return UIImage(imageLiteralResourceName: "firstaid") } } } // ii class AttractionAnnotation: NSObject, MKAnnotation { // iii let coordinate: CLLocationCoordinate2D let championship: String? permit subtitle: String? permit type: AttractionType // 4 init( coordinate: CLLocationCoordinate2D, championship: String, subtitle: String, type: AttractionType ) { self.coordinate = coordinate self.championship = championship cocky.subtitle = subtitle self.blazon = type } } Hither's what you added:
-
AttractionTypehelps yous categorize each attraction into a type. This enum lists iv types of annotations: misc, rides, foods and first aid. At that place's besides a handy method to grab the correct annotation image. - You create this class and make it conform to
MKAnnotation. - Much similar
MKOverlay,MKAnnotationhas a requiredcoordinateholding. You lot ascertain a scattering of properties specific to this implementation. - Finally, y'all define an initializer that lets you lot assign values to each of the properties.
Side by side, yous'll create a specific instance of MKAnnotationView to utilise for your annotations.
Associating a View With Your Annotation
First, create some other Swift file called AttractionAnnotationView.swift in Annotations grouping. Then, replace its contents with the following snippet:
import MapKit class AttractionAnnotationView: MKAnnotationView { // 1 // Required for MKAnnotationView required init?(coder aDecoder: NSCoder) { super.init(coder: aDecoder) } // 2 override init(note: MKAnnotation?, reuseIdentifier: String?) { super.init(annotation: note, reuseIdentifier: reuseIdentifier) guard allow attractionAnnotation = self.note equally? AttractionAnnotation else { return } image = attractionAnnotation.type.image() } } Hither's a lawmaking breakup:
-
MKAnnotationViewrequiresinit(coder:). Without its definition, an error prevents you from building and running the app. To avoid this, ascertain it and call its superclass initializer. - You lot likewise override
init(annotation:reuseIdentifier:)and set a different annotation epitome based on the annotation's type property.
Now that yous've created the notation and its associated view, you tin start adding annotations to your map view!
Adding Annotations to the Map
To decide the location of each note, you'll use the info in the MagicMountainAttractions.plist file, which you can find under the Park Information grouping. The plist file contains coordinate data and other details nigh the attractions at the park.
Get back to ContentView.swift and replace the TODO: implementation of addAttractionPins() with:
// one guard let attractions = Park.plist("MagicMountainAttractions") as? [[String: Cord]] else { return } // 2 for allure in attractions { let coordinate = Park.parseCoord(dict: allure, fieldName: "location") let title = attraction["proper name"] ?? "" let typeRawValue = Int(attraction["type"] ?? "0") ?? 0 let blazon = AttractionType(rawValue: typeRawValue) ?? .misc let subtitle = attraction["subtitle"] ?? "" // three let annotation = AttractionAnnotation( coordinate: coordinate, championship: title, subtitle: subtitle, blazon: blazon) mapView.addAnnotation(note) } Here'south a pace by step breakdown:
- Get-go, you read MagicMountainAttractions.plist and store it as an array of dictionaries.
- Then, you iterate over each dictionary in the array.
- For each entry, you create an case of
AttractionAnnotationwith the point's information and add it to the map view.
You're almost there! Final merely not least, you demand to implement another delegate method that provides the MKAnnotationView instances to the map view so it can render them on itself.
Add the following method to the Coordinator class at the meridian of the file:
func mapView( _ mapView: MKMapView, viewFor annotation: MKAnnotation ) -> MKAnnotationView? { allow annotationView = AttractionAnnotationView( notation: annotation, reuseIdentifier: "Attraction") annotationView.canShowCallout = true return annotationView } This method receives the selected MKAnnotation and uses it to create the AttractionAnnotationView. Since the property canShowCallout is set to true, a call-out appears when the user touches the annotation. Finally, the method returns the annotation view.
Build and run to see your annotations in action! Don't forget to turn on the :Pins: option.

The Attraction pins are looking rather sharp at this point! :]
So far, you've covered several complicated $.25 of MapKit, including overlays and annotations. But what if you need to use some cartoon primitives, like lines and circles?
The MapKit framework besides lets you describe straight onto a map view. MapKit provides MKPolyline, MKPolygon and MKCircle for this purpose. Time to try them out!
I Walk The Line: MKPolyline
If you've ever been to Magic Mountain, yous know that the Goliath hypercoaster is an incredible ride. Some riders like to make a beeline for information technology every bit soon as they walk in the gate! :]
To help these riders out, yous'll plot a path from the entrance of the park straight to the Goliath.
MKPolyline is a peachy solution for cartoon a path that connects multiple points, such as plotting a non-linear route from point A to indicate B.
To draw a polyline, y'all need a series of longitude and breadth coordinates in the order they should be plotted. EntranceToGoliathRoute.plist, once again found in the Park Information folder, contains the path information.
At present, you demand a way to read that plist file and create the route for the riders to follow.
Commencement, open up ContentView.swift and find addRoute(). And then, supercede it's electric current TODO implementation with:
guard permit points = Park.plist("EntranceToGoliathRoute") as? [String] else { return } let cgPoints = points.map { NSCoder.cgPoint(for: $0) } allow coords = cgPoints.map { CLLocationCoordinate2D( breadth: CLLocationDegrees($0.x), longitude: CLLocationDegrees($0.y)) } let myPolyline = MKPolyline(coordinates: coords, count: coords.count) mapView.addOverlay(myPolyline) This method reads EntranceToGoliathRoute.plist and converts the individual coordinate strings to CLLocationCoordinate2D structures.
It'south remarkable how unproblematic information technology is to implement a polyline: You simply create an array containing all of the points and pass it to MKPolyline! It doesn't become much easier than that.
Think, updateMapOverlayViews() already calls addRoute() whenever the user toggles this option via the UI. All that's left now is for you to update the consul method so information technology returns the actual view you want to render on the map view.
Get back to mapView(_:rendererFor:) and add this else if clause to the existing condition:
else if overlay is MKPolyline { allow lineView = MKPolylineRenderer(overlay: overlay) lineView.strokeColor = .green return lineView } The procedure of displaying the polyline view is very similar to previous overlay views. However, in this instance, yous don't demand to create any custom view objects. You simply use the provided MKPolyLineRenderer class and initialize a new instance with the overlay.
MKPolyLineRenderer also lets y'all alter some of the polyline'southward attributes. In this example, yous've modified the stroke color to prove as greenish.
Build and run your app. Enable the :Route: pick and it'll appear on the screen:
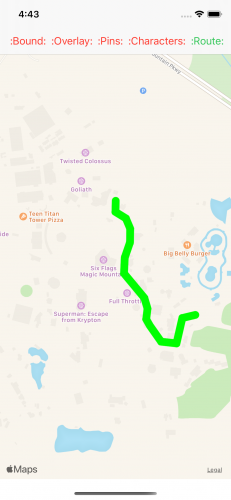
Now Goliath fanatics can arrive to the coaster in record time! :]
It would be dainty to show the park patrons where the park boundaries are, since the park doesn't actually occupy the entire space shown on the screen.
You could employ MKPolyline to draw a shape effectually the park boundaries, but MapKit provides another class specifically designed to draw closed polygons: MKPolygon.
Don't Contend Me In: MKPolygon
MKPolygon is similar to MKPolyline, except the first and terminal points in the set of coordinates are connected to each other to create a airtight shape.
You lot'll create an MKPolygon as an overlay that shows the park boundaries. The park purlieus coordinates are divers in MagicMountain.plist. Look at init(filename:) in Park.swift to come across where the boundary points are read from the plist file.
At present, in ContentView.swift, replace the TODO implementation of addBoundary() with:
mapView.addOverlay(MKPolygon( coordinates: park.boundary, count: park.boundary.count)) Given the boundary array and point count from the park example, you can quickly and easily create a new MKPolygon instance!
Can you guess the next step here? It's similar to what you did for MKPolyline.
Yup, that's right. MKPolygon conforms to MKOverlay like MKPolyline does, so you need to update the delegate method again.
Go back to mapView(_:rendererFor:) and add this else if clause to the existing weather condition:
else if overlay is MKPolygon { let polygonView = MKPolygonRenderer(overlay: overlay) polygonView.strokeColor = .magenta return polygonView } You create an MKOverlayView equally an instance of MKPolygonRenderer and set the stroke color to magenta.
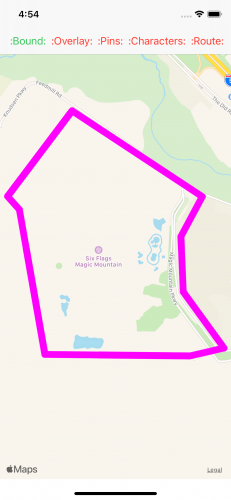
Run the app and enable the :Bound: option to encounter your new boundary in activity. You may accept to zoom out and so the park boundaries can fit the simulator'due south screen premises.
That takes care of polylines and polygons. The last cartoon method to cover is drawing circles as an overlay, which you'll do with MKCircle.
Circle in the Sand: MKCircle
MKCircle is as well very similar to MKPolyline and MKPolygon, except it draws a circle when given the center coordinate betoken and a radius that determines the size of the circle.
Many park visitors like to visit with the characters. Yous can help them detect the characters by marking where they were last spotted on the map with circles. The MKCircle overlay lets you practice this easily.
The Park Information folder also contains the character location files. Each file is an array of a few coordinates where the user spotted characters.
First, create a new swift file under the Models group called Character.swift. Then replace its contents with the following code:
import MapKit // 1 class Grapheme: MKCircle { // 2 individual var name: String? var color: UIColor? // 3 convenience init(filename: String, color: UIColor) { guard allow points = Park.plist(filename) as? [Cord] else { cocky.init() render } let cgPoints = points.map { NSCoder.cgPoint(for: $0) } let coords = cgPoints.map { CLLocationCoordinate2D( latitude: CLLocationDegrees($0.x), longitude: CLLocationDegrees($0.y)) } let randomCenter = coords[Int.random(in: 0...3)] let randomRadius = CLLocationDistance(Int.random(in: 5...39)) cocky.init(center: randomCenter, radius: randomRadius) self.name = filename self.color = color } } Hither's what this lawmaking does:
- Character class conforms to
MKCircleprotocol. - It defines two optional backdrop:
proper nameandcolor. - The convenience initializer accepts a plist filename and colour to draw the circumvolve. Then it reads in the data from the plist file and selects a random location from the four locations in the file. Next, it chooses a random radius to simulate the fourth dimension variance. The
MKCirclereturned is set and ready to be put on the map!
At present you need a method to add the characters. Then, open ContentView.swift and supplant the TODO implementation of addCharacterLocation() with:
mapView.addOverlay(Character(filename: "BatmanLocations", color: .bluish)) mapView.addOverlay(Character(filename: "TazLocations", color: .orange)) mapView.addOverlay(Character(filename: "TweetyBirdLocations", color: .yellow)) This method performs pretty much the aforementioned operations for each character: It passes the plist filename for each one, decides on a color and adds information technology to the map equally an overlay.
You lot're virtually done! Do you remember the last stride?
Right! Y'all need to give the map view a MKOverlayView by using the delegate method.
Go back to mapView(_:rendererFor:) and add this else if clause to the existing atmospheric condition:
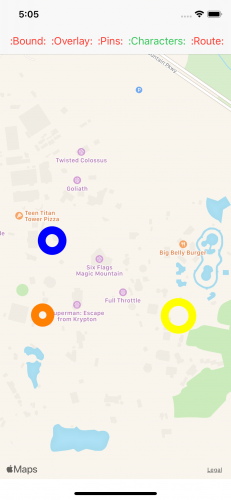
else if let grapheme = overlay equally? Graphic symbol { let circleView = MKCircleRenderer(overlay: grapheme) circleView.strokeColor = character.color return circleView } Build and run the app, and enable the :Characters: option to see where everyone is hiding!
Where to Go From Here?
Yous can download the complete projection by using the Download Materials button at the top or bottom of this tutorial.
Congratulations! You've worked with some of the well-nigh important capabilities that MapKit provides. With a few basic functions, you've implemented a total-blown and practical mapping app complete with annotations and custom overlays.
In that location are many means to generate overlays that range from very like shooting fish in a barrel to very complex. The approach taken in this tutorial for the overlay_park image was the easy, withal tiresome, route.
There are much more advanced, and perhaps more than efficient, methods to create overlays. For instance, you could use KML tiles or other third party provided resource.
To learn more almost MapKit, bank check out the other MapKit tutorials on our site, such equally Avant-garde MapKit Tutorial: Custom Tiles.
I hope you enjoyed this tutorial, and I hope to see you utilise MapKit overlays in your ain apps. If you have any questions or comments, please join the forum give-and-take below!
Source: https://www.raywenderlich.com/9956648-mapkit-tutorial-overlay-views
0 Response to "Draw Circle on Map Swift"
Post a Comment